Naan-sense!
- The Culinator (aka Jim)
- Nov 28, 2021
- 5 min read
Persian Naan Bread


The first time I had Naan bread was at a seaside restaurant in Mombasa, Kenya. No knowing the spelling, I was a bit confused trying to figure out what "non-bread" was if it wasn't bread. In any case it was deliciously soft and chewy. I couldn't wait to try this recipe when I saw it and, I must say, it was delicious!
It was easy to make and the process was a lot of fun as it involved kneading, rising, and poking. I find the most relaxing baking is when I get to physically work with it during the kneading and poking process such as was used with this. Well, I enjoy it once the dough gets beyond the gluey and really sticky stage that tries to trap me like a tar baby!
The ingredients for this Persian Naan bread were: - 2 1/2 cups tepid water (80-90F)
- 2 tsp active dry yeast
- 5-6 cups bread flour or unbleached all-purpose flour
- 1 tsp salt
- 4 tsp sesame seeds
I'm still trying to get used to the "chemistry" aspect of baking where I need to pay attention and be a bit more precise with measurements than cooking "normal" food. I think i did them right this time, though, because the results turned out pretty good. I'm also getting used to how adding some yeast to the inanimate flour and water seems to bring it to life. Seeing the small blob of dough drown and expand is really impressive and a bit creepy at the same time!
Once I'd gathered the ingredients I needed to start the Dr. Frankenstein part of bringing the ingredients to life. The yeast was added to the water and blended. As I've learned before, taking a minute or two to ensure the yeasty liquid turns a creamy color and starts to bubble a bit lets me know that my yeast wasn't dead. I'll need to learn more about yeast because I'm not exactly sure what it is. Is it an animal? A plant? How is it "alive." In the meantime, I try not to think too much about it and accept it for its magical properties. Three cups of the flour were then added to the yeast water, one cup at a time. I'm not sure why it was important but Julia stressed that it was important to stir "in one direction with a wooden spoon" for 1 minute or about 100 strokes. That's a pretty rapid stirring, almost two strokes per second, and it is done to develop the gluten.


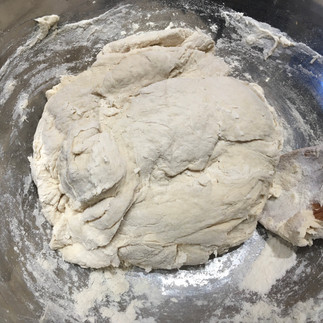
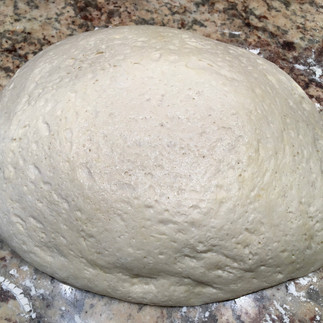
After the initial mixing, the salt was sprinkled over the top and the remaining flour was added about one cup at a time. Each time I added flour I also stirred it in until the dough became too stiff to work. Then the dough was moved from the bowl to a floured work surface and knead vigorously. Kneading went on for about ten minutes until the dough was smooth and easy to handle. I love the dough at that point -- it's no longer gooey and sticky and is easy to work with.


Of course, everyone likes resting after a good workout and this dough was no different. After the kneading was complete (we all are needy at times, right?) the dough was transferred into a lightly oiled bowl and turned so that the entire surface of the dough was covered with oil. To give it a little privacy, the bowl was covered with plastic wrap and allowed to rest at room temperature for about two hours -- until it had doubled in size. That's the magical part -- what exactly are those little yeast creatures doing that gets this dough to grow so much while it is resting?


Humility is important so after the dough has finished rising I needed to deflate it. By just moving it around a bit it reduced its size to a more workable blob which I could then divide into four ovals about six inches by eight inches each. Those pieces were then covered with plastic wrap and allowed to rest for a couple of minutes to relax their gluten. Nobody wants to have tired gluten, right? While they were resting I started preheating the oven and my stone pizza pan to 500F. These things like it hot when they bake!
Then it was time for the really fun part -- shaping the dough! Starting at one end of the ovals I began poking my fingers in to make deep depressions. Having a bowl of cold water nearby kept the dough from sticking to my fingers -- dip and poke, repeat. The indentations went all across the dough and needed to be deep enough to remain after the next step of stretching the dough. The surface of the dough looked a bit sloppy from the water but that was okay, it was supposed to be that way. After all of the dimples have been made I draped the dough over my hands and began stretching it by slowly pulling my hands apart. Remember, we're not making pizza here so there's no tossing and twirling! The goal is to end up with ovals about 5 inches wide and about 16-18 inches long. If the oval ends up with a couple of holes in it, it doesn't care!


Then it was time to finish the bread by baking it for about five minutes. After sprinkling the moistened dough with sesame seeds, they went onto the baking stone (Julia said you can use quarry tiles, a baking stone, or an inverted baking sheet) after it was dusted with cornmeal. I was able to bake a couple at a time but made sure they had at leas an inch or so between each. They baked for about five minutes and were done once the top had some golden patches and the bottoms were brown and crusty.


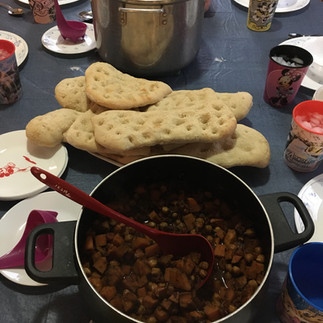
The naan bread went right from the oven and straight to the table where everyone immediately enjoyed eating it with some of Elizabeth's wonderful African peanut soup. The grandkids really enjoyed being able to pull apart chunks of the bread as it was served. We all agreed that this bread was absolutely delicious, especially being served warm and fresh out of the oven.
This particular naan bread is called "Persian Naan." In the future I want to try a variation called "Oasis Naan." The Oasis version is the same basic recipe but it is shaped into rounds and the center is sprinkled with scallions, salt, and a bit of cumin. The edges are left thicker, sort of like a pizza crust, as well. Stay tuned, I'll probably try that version the next time I make naan! If you try either of these, please let me know how it turned out and how you liked it.
As always, bon appetit!
I got the pleasure of eating this, and it really was delicious!