
It was time to conquer my fear of pastry shells. Months ago I made a quiche and didn't have a lot of fun making the pastry shell for it so I've been avoiding any of Julia's recipes that included a pastry shell. I don't know what came over me but I decided to attempt the La Tarte Des Demoiselles Tatin (Upside-Down Apple Tart) -- probably because I knew it would be upside down and would hide the crust underneath... I'm glad I did because it worked!!!
Four pounds of apples went into this so it would almost qualify as French health food, right? I'm not sure if 8 tablespoons of butter and almost a cup of sugar affected the health food status but it certainly affected the taste. Those four pounds of apples were cored, cut in half, peeled, and then sliced into about 1/8" slices. If you're having a stressful day, this was actually a bit relaxing, plus I was able to snitch a slice of apple every once in awhile.


As they were sliced, the apples went into a bowl with 1/3 cup of sugar and a heaping teaspoon of cinnamon. The slices were then tossed in the bowl to give them a coating of the cinnamon and sugar. Julia said the cinnamon was optional but I think it should be required anytime you're baking something with apples. Once the apples were all sliced and tossed in the sugar mixture, they were ready to go into a 9x9 Pyrex baking dish.
The dish was buttered, very heavily on the bottom, and then coated with another 1/4 cup of sugar. The goal was to have the apples coated with a nice carmelized layer on the bottom, which would become the top after baking. About 1/3 of the apple slices were then layered in the dish and sprinkled with 2 tablespoons of melted butter. Another 1/3 of the apple slices went into another layer and another 2 tablespoons of melted butter on that.


Then in went the rest of the apples, another 2 tablespoons of butter, and on top of that another 1/4 cup of sugar. Now it was time to truly conquer my fears and attack the crust!
One of the things keeping me from making pastry shells has been Julia's instruction to mush everything quickly with your hand while keeping the dough cold. Then she wants me to put the dough into the fridge for a couple of hours, then work it into the thickness needed for the shell. Honestly, I don't have the time (or patience) to do a process that takes that long -- I'm already realllllllly slow making some of these things! So I, once again, used some culinary license and modified the process. Instead of mixing the ingredients with my bare hand, I used a cold metal spoon in a cold metal mixing bowl and it seemed to work.


Without any real confidence I put 2/3 a cup of flour in a mixing bowl with 1 tablespoon of sugar, 1/8 teaspoon of salt, 4 tablespoons of chilled butter, 1 1/2 tablespoons of chilled vegetable shortening, and finally 2 1/2 to 3 tablespoons of cold water. I'm not sure why but I do know that keeping things as cold as possible are important. Again, instead of using my hand to mix things up I ended up using the back side of a large metal serving spoon and it seemed to work really well. Well enough that I'll do it that way in the future!
A couple of interesting things about this dough. It is actually called Pate Brisee Sucree (Sweet Short Paste) and not a dough. If its a paste it sure tasted better than the paste we used to taste in elementary school! It is apparently made exactly the same as a "regular short paste" except that the sugar is mixed into the flour at the beginning. "Ding!" A little bell just went off in my head -- these are called "pastes" -- I bet that has something to do with these things being called "pastries." Interesting. I may need to consult Google to learn more about that later, but for now it is back to the tart! Another interesting thing about Julia's recipe - for the tart she specified using the measurements for "1 cup of flour." The paste recipe shows in bold print: "Proportions for 1 cup flour." But the recipe only uses 2/3 cup of flour?!?! What's up with that? Was she just trying to confuse me? It worked. I actually had a 1/3 cup of flour measured out and on the counter. I used a bit of it to dust the mat and crust while rolling it out but ended up putting most of it back into the flour container. Go figure.
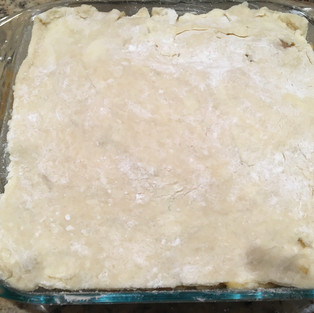
Once everything was thoroughly mixed, Julia kept screaming for me to put the paste in the fridge for a couple of hours but I went straight to a lightly floured pastry mat and began rolling it out with a rolling pin. My rolling pin has these really cool changeable spacers on the end (hmmm, I should have taken a photo) so I can set the height. I set it for 1/8" and rolled the dough out so it'd be a little bigger than the 9" baking dish. Then, using my calibrated eyeballs, I cut out a 9x9 square and transferred it on top of the apples in the baking dish.
Then the dish went into the preheated oven (375 degrees) for an hour. Julia said the "tart is done when you tilt the dish and see that a thick brown syrup rather than a light liquid exudes from the apples between the crust and the edge of the dish." Hmmmmmmmm. That never happened. I actually baked it for an additional 20 minutes and the liquid remained quite liquidy. The crust wasn't burning at all so I felt it safe to cook for the extra time and finally decided it was time to give up and take it out of the oven.
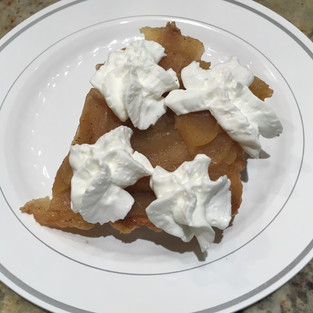
Expecting the juice to run out, I turned the tart over onto a plate and temporarily put the plate onto a cookie sheet to catch anything juice that ran off. It did, but it wasn't horrible. I'm truly a bit baffled why the juice never turned syrupy -- I hadn't added any liquid. I suppose they were just juicy apples? Because of the juice, the sugar on the bottom (now top) didn't carmelize but it still looked pretty tasty.
I'm pretty disappointed that my crust turned out really nice but ended up being on the bottom of the tart where no one saw it. It was a really nice and flaky, crispy crust that tasted downright delicious. I loved eating it plain but my sous chef, Elizabeth, liked adding some home made whipped cream -- actually, she shook the can of "whipped topping" and sprayed some of it onto her piece. Definitely not a French topping...
There you have it! My first successful tart and a pastry crust that didn't take me all afternoon to make. A nice treat when you're in the mood for something sweet!
Bon Appetit!


Commenti